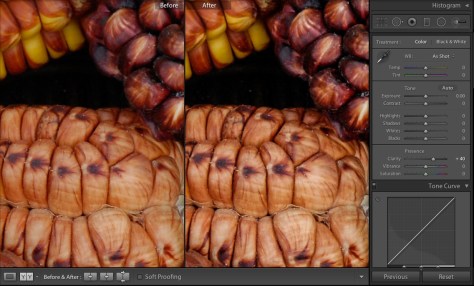
Many reviewers have commented on the superb image quality of the Nikon D810, even when compared with excellent cameras like the D800E. After taking many images with the D810 I have to say that indeed you get really good photos, even as out-of-camera jpegs. The surprising thing to me was that I could get comparable image quality from earlier and cheaper cameras just by doing a simple adjustment in Lightroom.
Many people describe the photos from the D810 as if a veil has been lifted from the image and the detail you see in the 100 % screen view is crisper and cleaner than ever before. It didn’t take me long to see that the default settings of the D810 include a new “Clarity” adjustment and wondered if this was making the difference.
Naturally, you cannot get 36 megapixels out of 6 megapixels, and modern sensors have a much improved dynamic range; but when applying Clarity to well-exposed, low-ISO photos I was able to get the same crisp and clean look, even from the old jpegs of my lowly Nikon D70.
If you don’t believe me, check the Adobe Lightroom screen captures but remember: this is a subtle effect you can only see at 100 % screen magnification. Take your time as the large image compression in web pages makes it hard to show small details.
Do your own tests later and, please, let me know your results.


If you want to see comparison shots of the same scene taken with the D810 and the very similar camera D800 (or any other recent model) check out the sample photos from The Imaging Resource. They do a very comprehensive job:
http://www.imaging-resource.com/PRODS/nikon-d810/nikon-d810A7.HTM
http://www.imaging-resource.com/PRODS/nikon-d800/nikon-d800THMB.HTM
LikeLike
Agree the Clarity slider is a most useful tool and every photo I import to LR starts with a default of +10 on Clarity. I then tweak further as I optimally adjust black and white levels on an image by image basis.
I understand that an Unsharp Mask of 50 or so pixels radius used in Photoshop has the same broad effect which is to improve local mid level contrast.
Clarity can be overdone and detail then lost, so its use needs to be sympathetic to the original image. Heavier applications work well when the original image has rather flat lighting like it would appear has been the case with your examples.
LikeLiked by 1 person
Excellent comment! Clarity is the new name for “Local Contrast Enhancement” and “High Radius Low Amount” applications of Unsharp Masking and should be used with the same caution. The right amount will depend on the image pixel size and, as you indicate, its microcontrast.
LikeLike
I’ve been telling people for years that “megapixels” aren’t your friend so much as image quality is. I’d rather have 10 large megapixels than 20 small megapixels on the same size sensor, because the quality you can squeeze out of those 10 megapixels are usually better and nearly always have far less noise at higher ISOs.
Alas, megapixels always win in the marketing campaign and true, measurable image quality gets neglected except by those of us who know better. Great post.
LikeLike
You are right… this is why the top D3, D4… Nikon Series are designed with a lower pixel count.
LikeLiked by 2 people
I am probably guilty of overkill with ‘clarity’ in Photoshop. Will now work with a default of ‘+10 and tweak as required’. Thanks for the tip.
LikeLike
Although there is nothing written in stone about processing an image –each image: one adventure– I believe the general guidelines are that subjects with defined borders are better sharpened normally, and subjects with subtle detail benefit from clarity sharpening. This is what @aussiesouthlander points out above. Sometimes a combination of the two can be fine. Based on very interesting comments to this post I am writing a new one about that subject.
LikeLike
Hi admin, i found this post on 16 spot in google’s search results.
I’m sure that your low rankings are caused by hi bounce
rate. This is very important ranking factor. One of the biggest reason for high bounce rate is
due to visitors hitting the back button. The higher your bounce rate
the further down the search results your posts and pages will end up, so having reasonably low bounce rate is important for improving your
rankings naturally. There is very useful wp plugin which can help you.
Just search in google for:
Seyiny’s Bounce Plugin
LikeLiked by 1 person
Thank you! I will definitely look into it. I’m new to blogging and do appreciate any tips.
LikeLike